git merge conflicts
Learning Objectives
In this lesson, you will learn:
- What typically causes conflicts when collaborating
- Workflows to avoid conflicts
- How to resolve a conflict
Before we start
First thing to know is that actually git pull is a two step process: git pull = git fetch + git merge
Second: you did nothing wrong!! Git tries to merge files automatically. When the changes are on the same file far apart, git will figure it out on his own and do the merge automatically. However if changes are overlapping, git will call you to the rescue and ask you how to best merge the two versions.
Merge conflicts
So things can go wrong, which usually starts with a merge conflict, due to both collaborators making incompatible changes to a file. While the error messages from merge conflicts can be daunting, getting things back to a normal state can be straightforward once you’ve got an idea where the problem lies.
This is most easily avoided by good communication about who is working on various sections of each file, and trying to avoid overlaps. But sometimes it happens, and git is there to warn you about potential problems. And git will not allow you to overwrite one person’s changes to a file with another’s changes to the same file if they were based on the same version.

The main problem with merge conflicts is that, when the Owner and Collaborator both make changes to the same line of a file, git doesn’t know whose changes take precedence. You have to tell git whose changes to use for that line.
How to resolve a conflict
Abort, abort, abort…
Sometimes you just made a mistake. When you get a merge conflict, the repository is placed in a ‘Merging’ state until you resolve it. There’s a command line command to abort doing the merge altogether:
git merge --abortOf course, after doing that you still haven’t synced with your collaborator’s changes, so things are still unresolved. But at least your repository is now usable on your local machine.
Checkout
The simplest way to resolve a conflict, given that you know whose version of the file you want to keep, is to use the command line git program to tell git to use either your changes (the person doing the merge), or their changes (the other collaborator).
- keep your collaborators file:
git checkout --theirs conflicted_file.Rmd - keep your own file:
git checkout --ours conflicted_file.Rmd
Once you have run that command, then run add, commit, and push the changes as normal.
Pull and edit the file
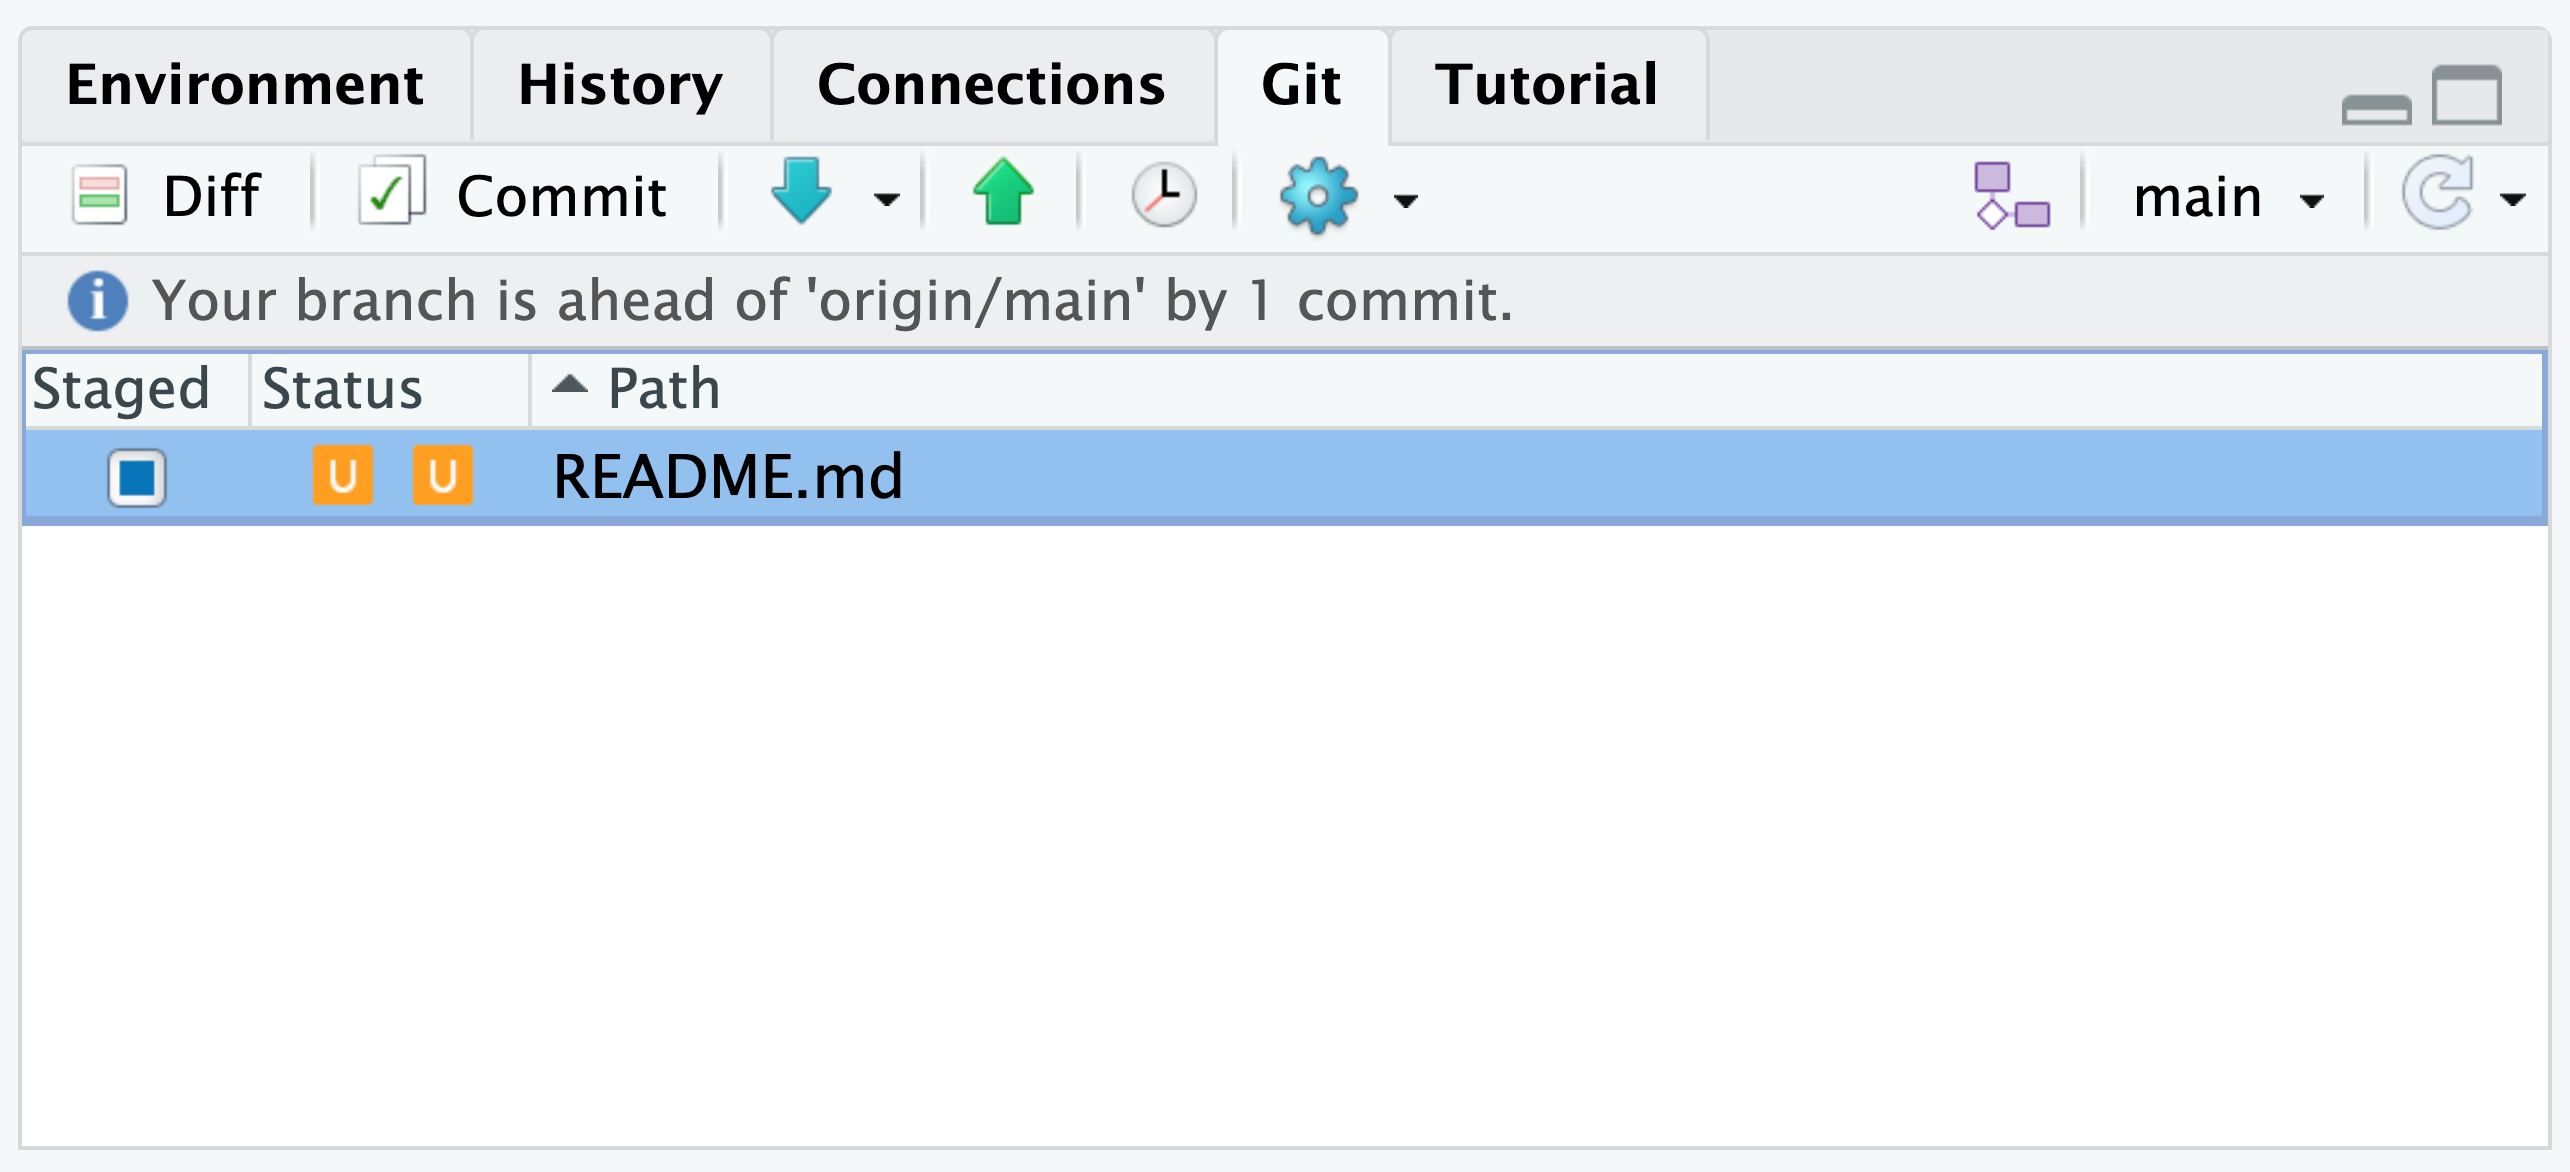
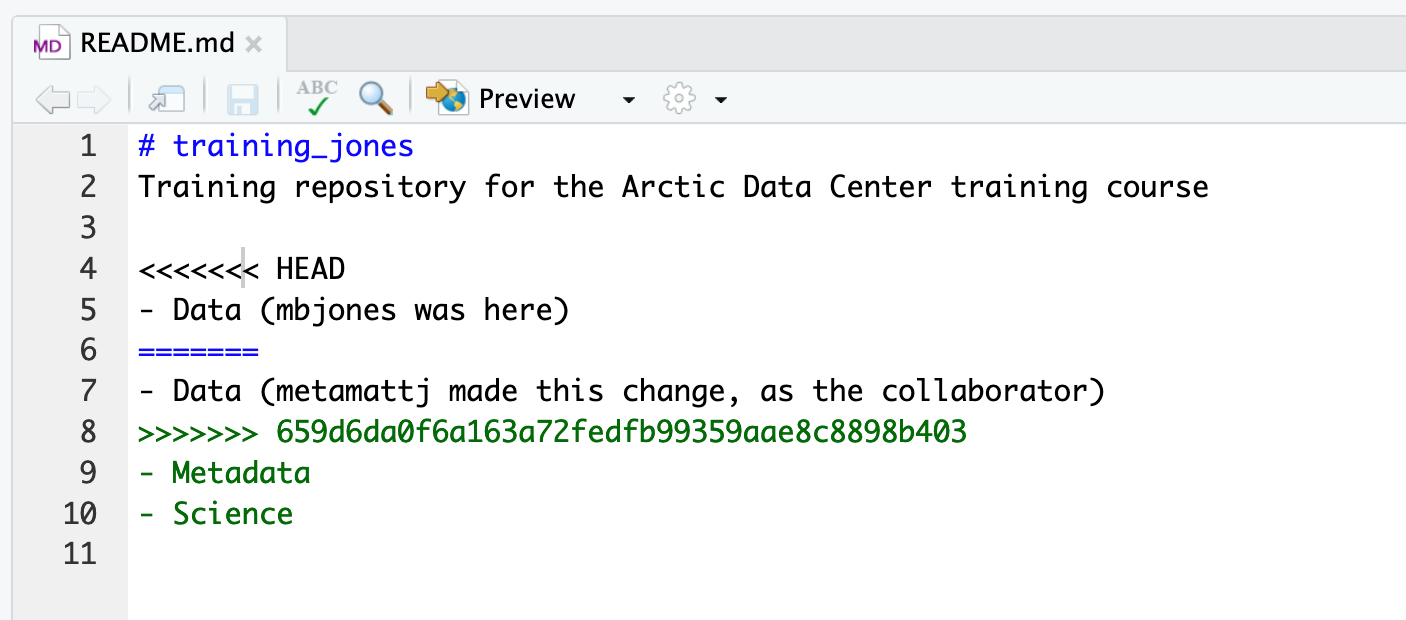
But that requires the command line. If you want to resolve from RStudio, or if you want to pick and choose some of your changes and some of your collaborator’s, then instead you can manually edit and fix the file. When you pulled the file with a conflict, git notices that there is a conflict and modifies the file to show both your own changes and your collaborator’s changes in the file. It also shows the file in the Git tab with an orange U icon, which indicates that the file is Unmerged, and therefore awaiting you help to resolve the conflict. It delimits these blocks with a series of less than and greater than signs, so they are easy to find:
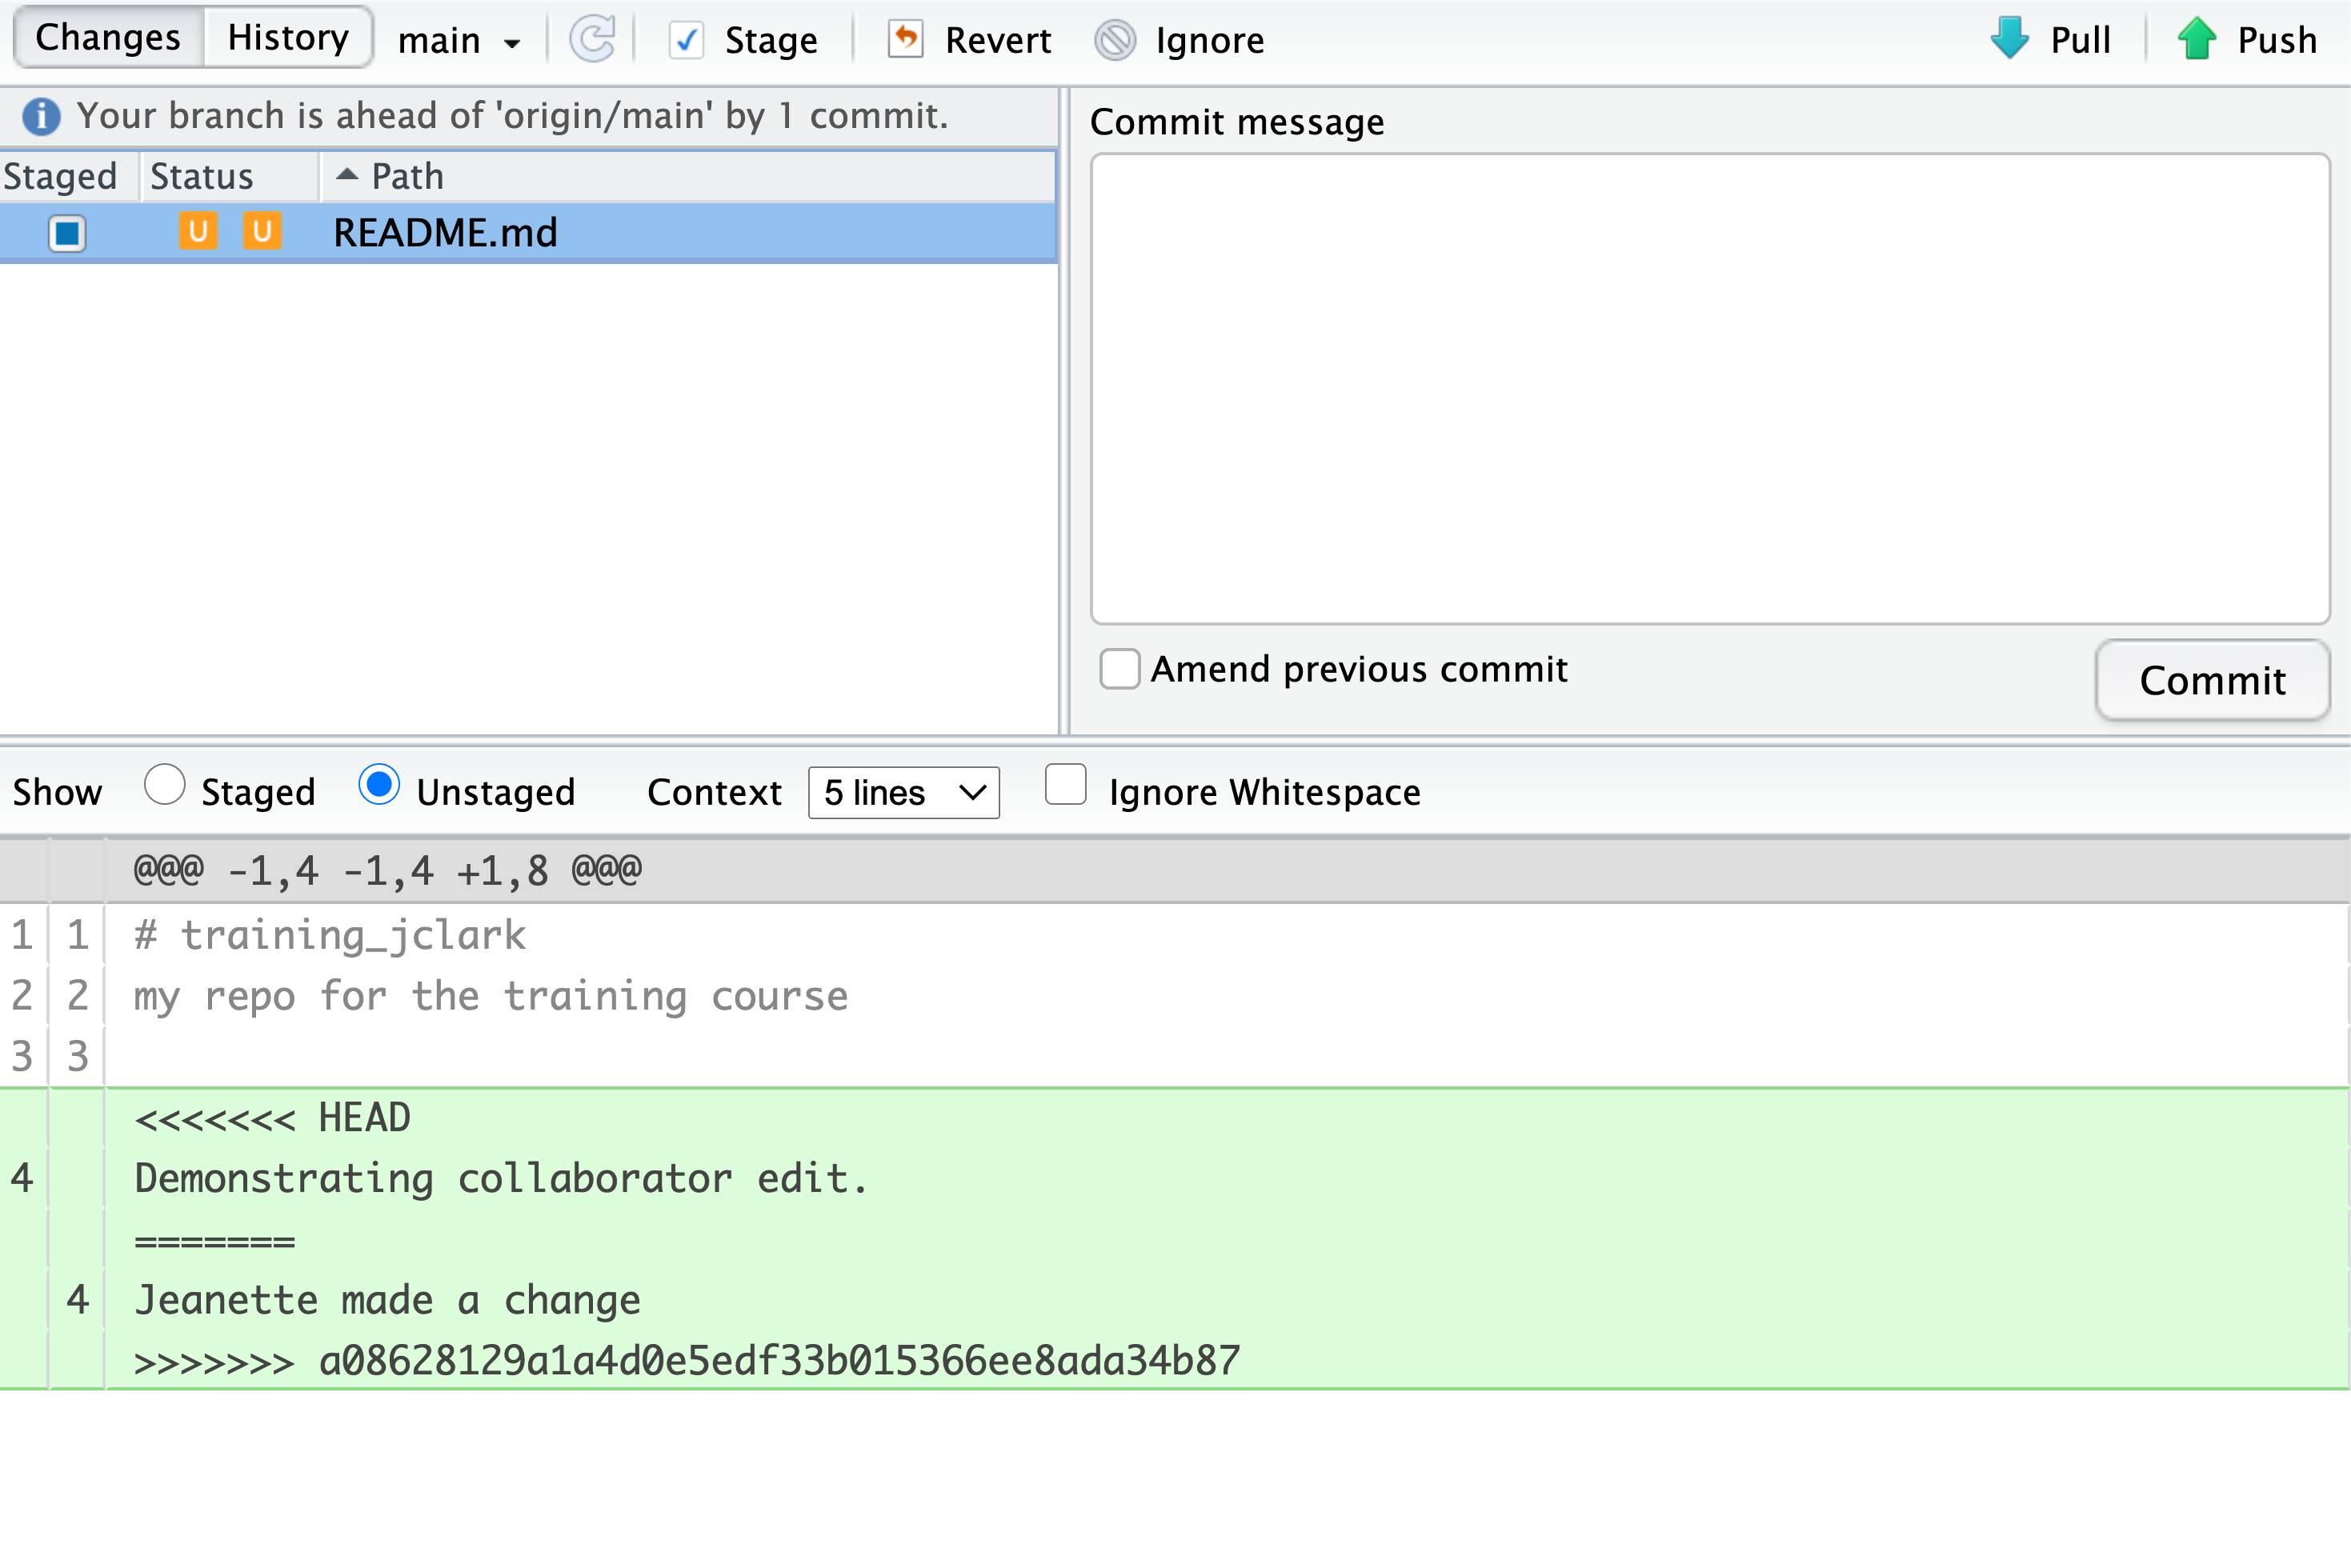
To resolve the conficts, simply find all of these blocks, and edit them so that the file looks how you want (either pick your lines, your collaborators lines, some combination, or something altogether new), and save. Be sure you removed the delimiter lines that started with <<<<<<<, =======, and >>>>>>>.
Once you have made those changes, you simply add, commit, and push the files to resolve the conflict.
Producing and resolving merge conflicts
To illustrate this process, we’re going to carefully create a merge conflict step by step, show how to resolve it, and show how to see the results of the successful merge after it is complete. First, we will walk through the exercise to demonstrate the issues.
Owner and collaborator ensure all changes are updated
First, start the exercise by ensuring that both the Owner and Collaborator have all of the changes synced to their local copies of the Owner’s repositoriy in RStudio. This includes doing a git pull to ensure that you have all changes local, and make sure that the Git tab in RStudio doesn’t show any changes needing to be committed.
Owner makes a change and commits
From that clean slate, the Owner first modifies and commits a small change inlcuding their name on a specific line of the README.md file (we will change line 4). Work to only change that one line, and add your username to the line in some form and commit the changes (but DO NOT push). We are now in the situation where the owner has unpushed changes that the collaborator can not yet see.
Collaborator makes a change and commits on the same line
Now the collaborator also makes changes to the same of the README.md file in their RStudio copy of the project, adding their name to the line. They then commit. At this point, both the owner and collaborator have committed changes based on their shared version of the README.md file, but neither has tried to share their changes via GitHub.
Collaborator pushes the file to GitHub
Sharing starts when the Collaborator pushes their changes to the GitHub repo, which updates GitHub to their version of the file. The owner is now one revision behind, but doesn’t yet know it.
Owner pushes their changes and gets an error
At this point, the owner tries to push their change to the repository, which triggers an error from GitHub. While the error message is long, it basically tells you everything needed (that the owner’s repository doesn’t reflect the changes on GitHub, and that they need to pull before they can push).
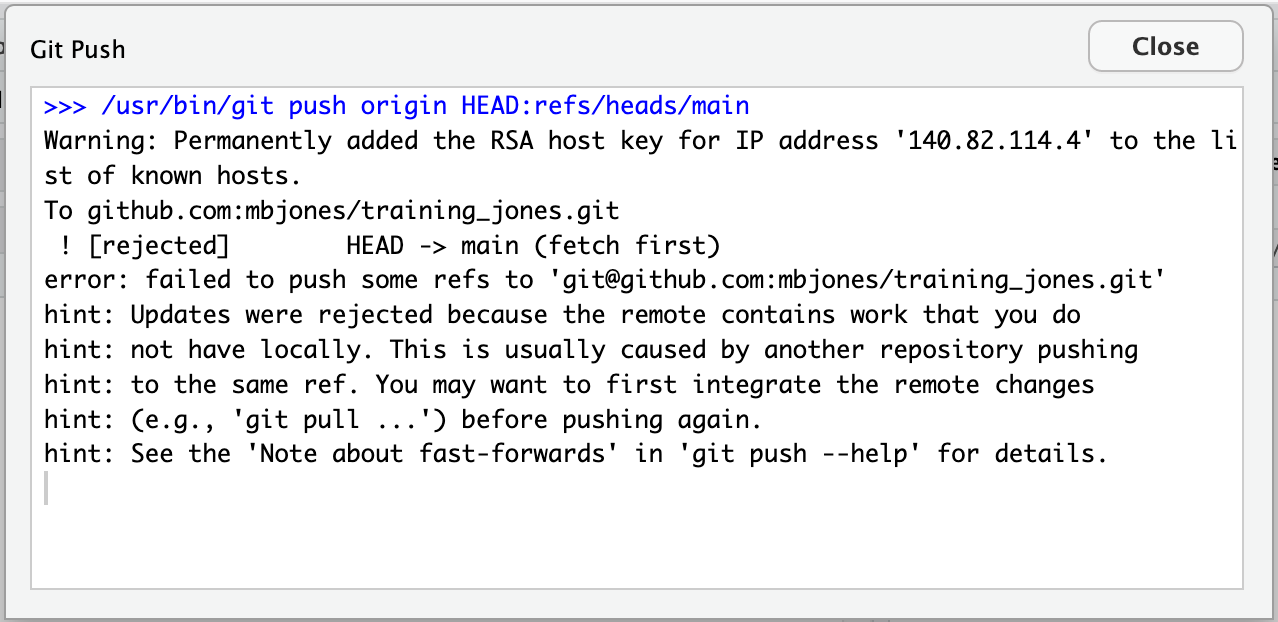
Owner pulls from GitHub to get Collaborator changes
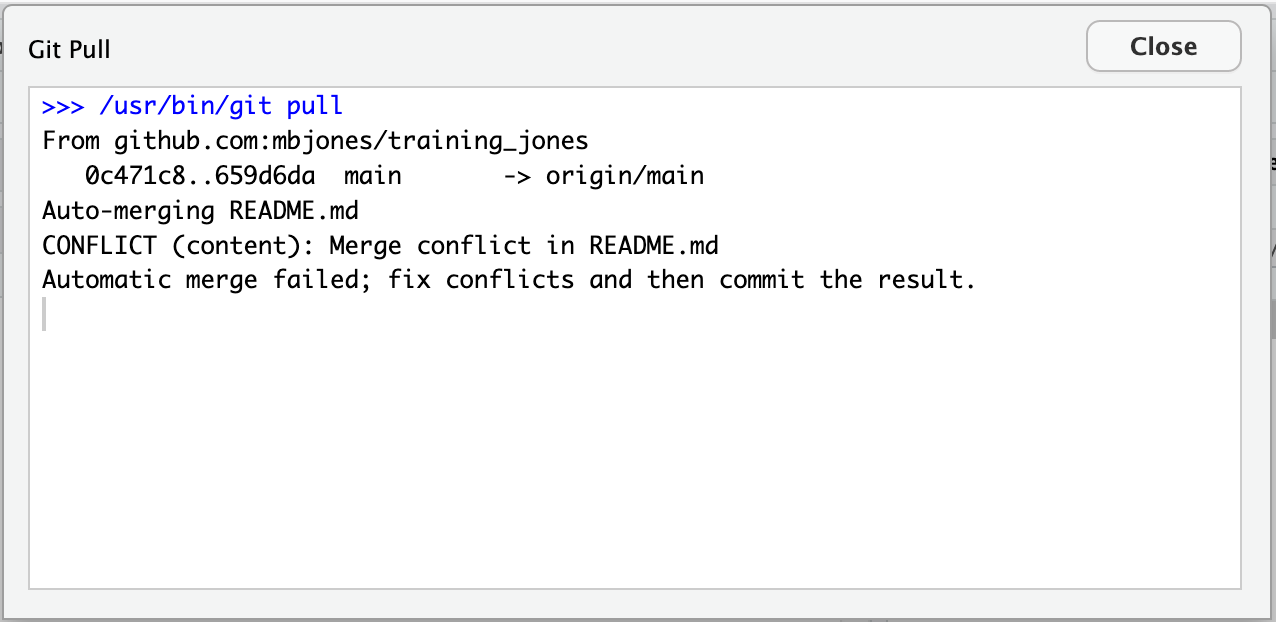
Doing what the message says, the Owner pulls the changes from GitHub, and gets another, different error message. In this case, it indicates that there is a merge conflict because of the conflicting lines.
In the Git pane of RStudio, the file is also flagged with an orange ‘U’, which stands for an unresolved merge conflict.
Owner edits the file to resolve the conflict
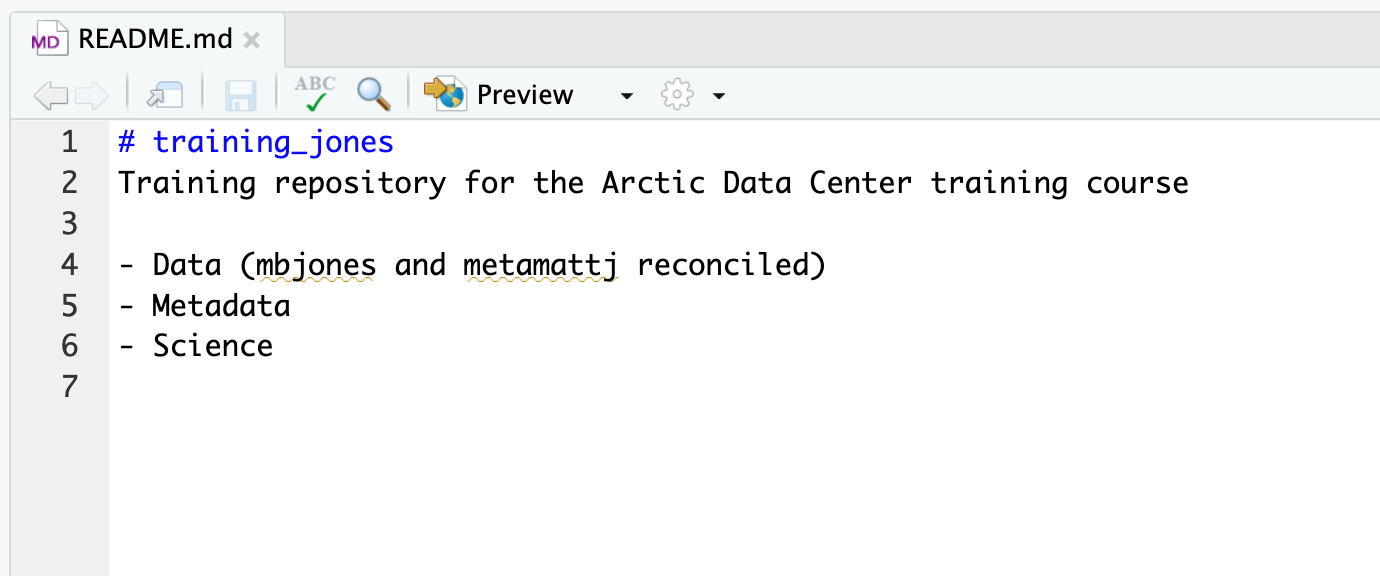
To resolve the conflict, the Owner now needs to edit the file. Again, as indicated above, git has flagged the locations in the file where a conflict occcurred with <<<<<<<, =======, and >>>>>>>. The Owner should edit the file, merging whatever changes are appropriate until the conflicting lines read how they should, and eliminate all of the marker lines with with <<<<<<<, =======, and >>>>>>>.
Of course, for scripts and programs, resolving the changes means more than just merging the text – whoever is doing the merging should make sure that the code runs properly and none of the logic of the program has been broken.
Owner commits the resolved changes
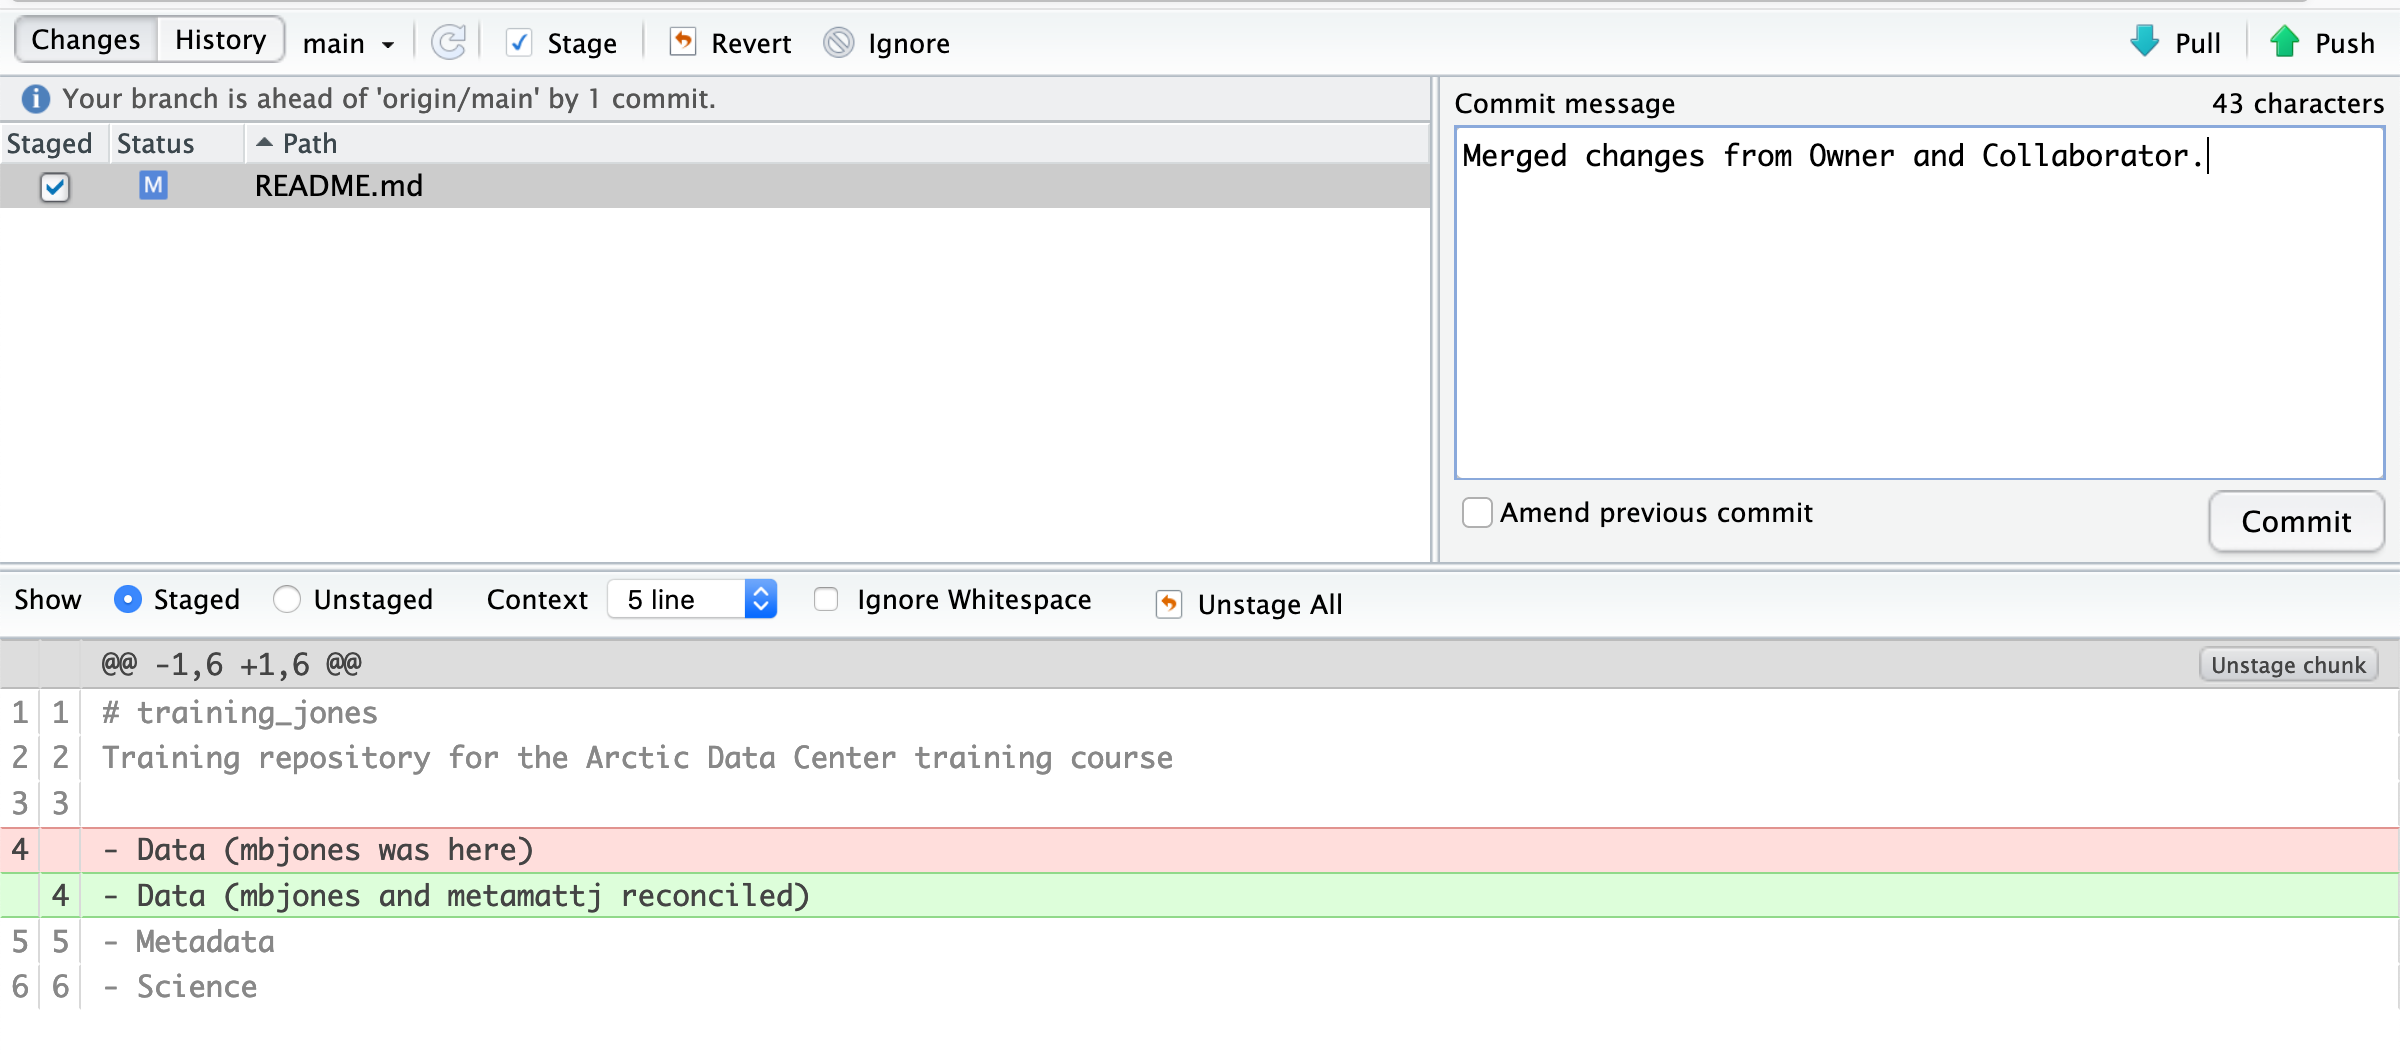
From this point forward, things proceed as normal. The owner first ‘Adds’ the file changes to be made, which changes the orange U to a blue M for modified, and then commits the changes locally. The owner now has a resolved version of the file on their system.
Owner pushes the resolved changes to GitHub
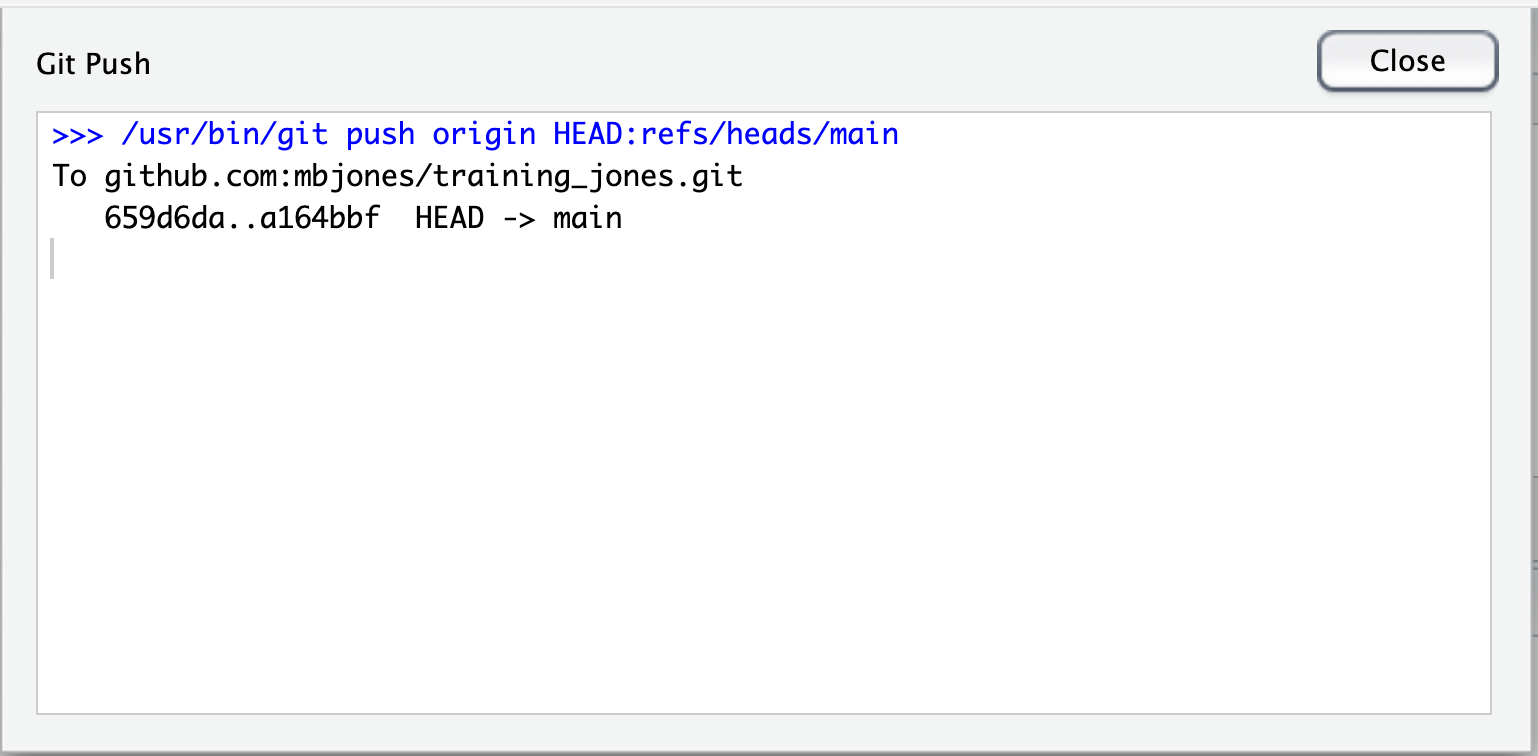
Have the Owner push the changes, and it should replicate the changes to GitHub without error.
Collaborator pulls the resolved changes from GitHub
Finally, the Collaborator can pull from GitHub to get the changes the owner made.
Both can view commit history
When either the Collaborator or the Owner view the history, the conflict, associated branch, and the merged changes are clearly visible in the history.
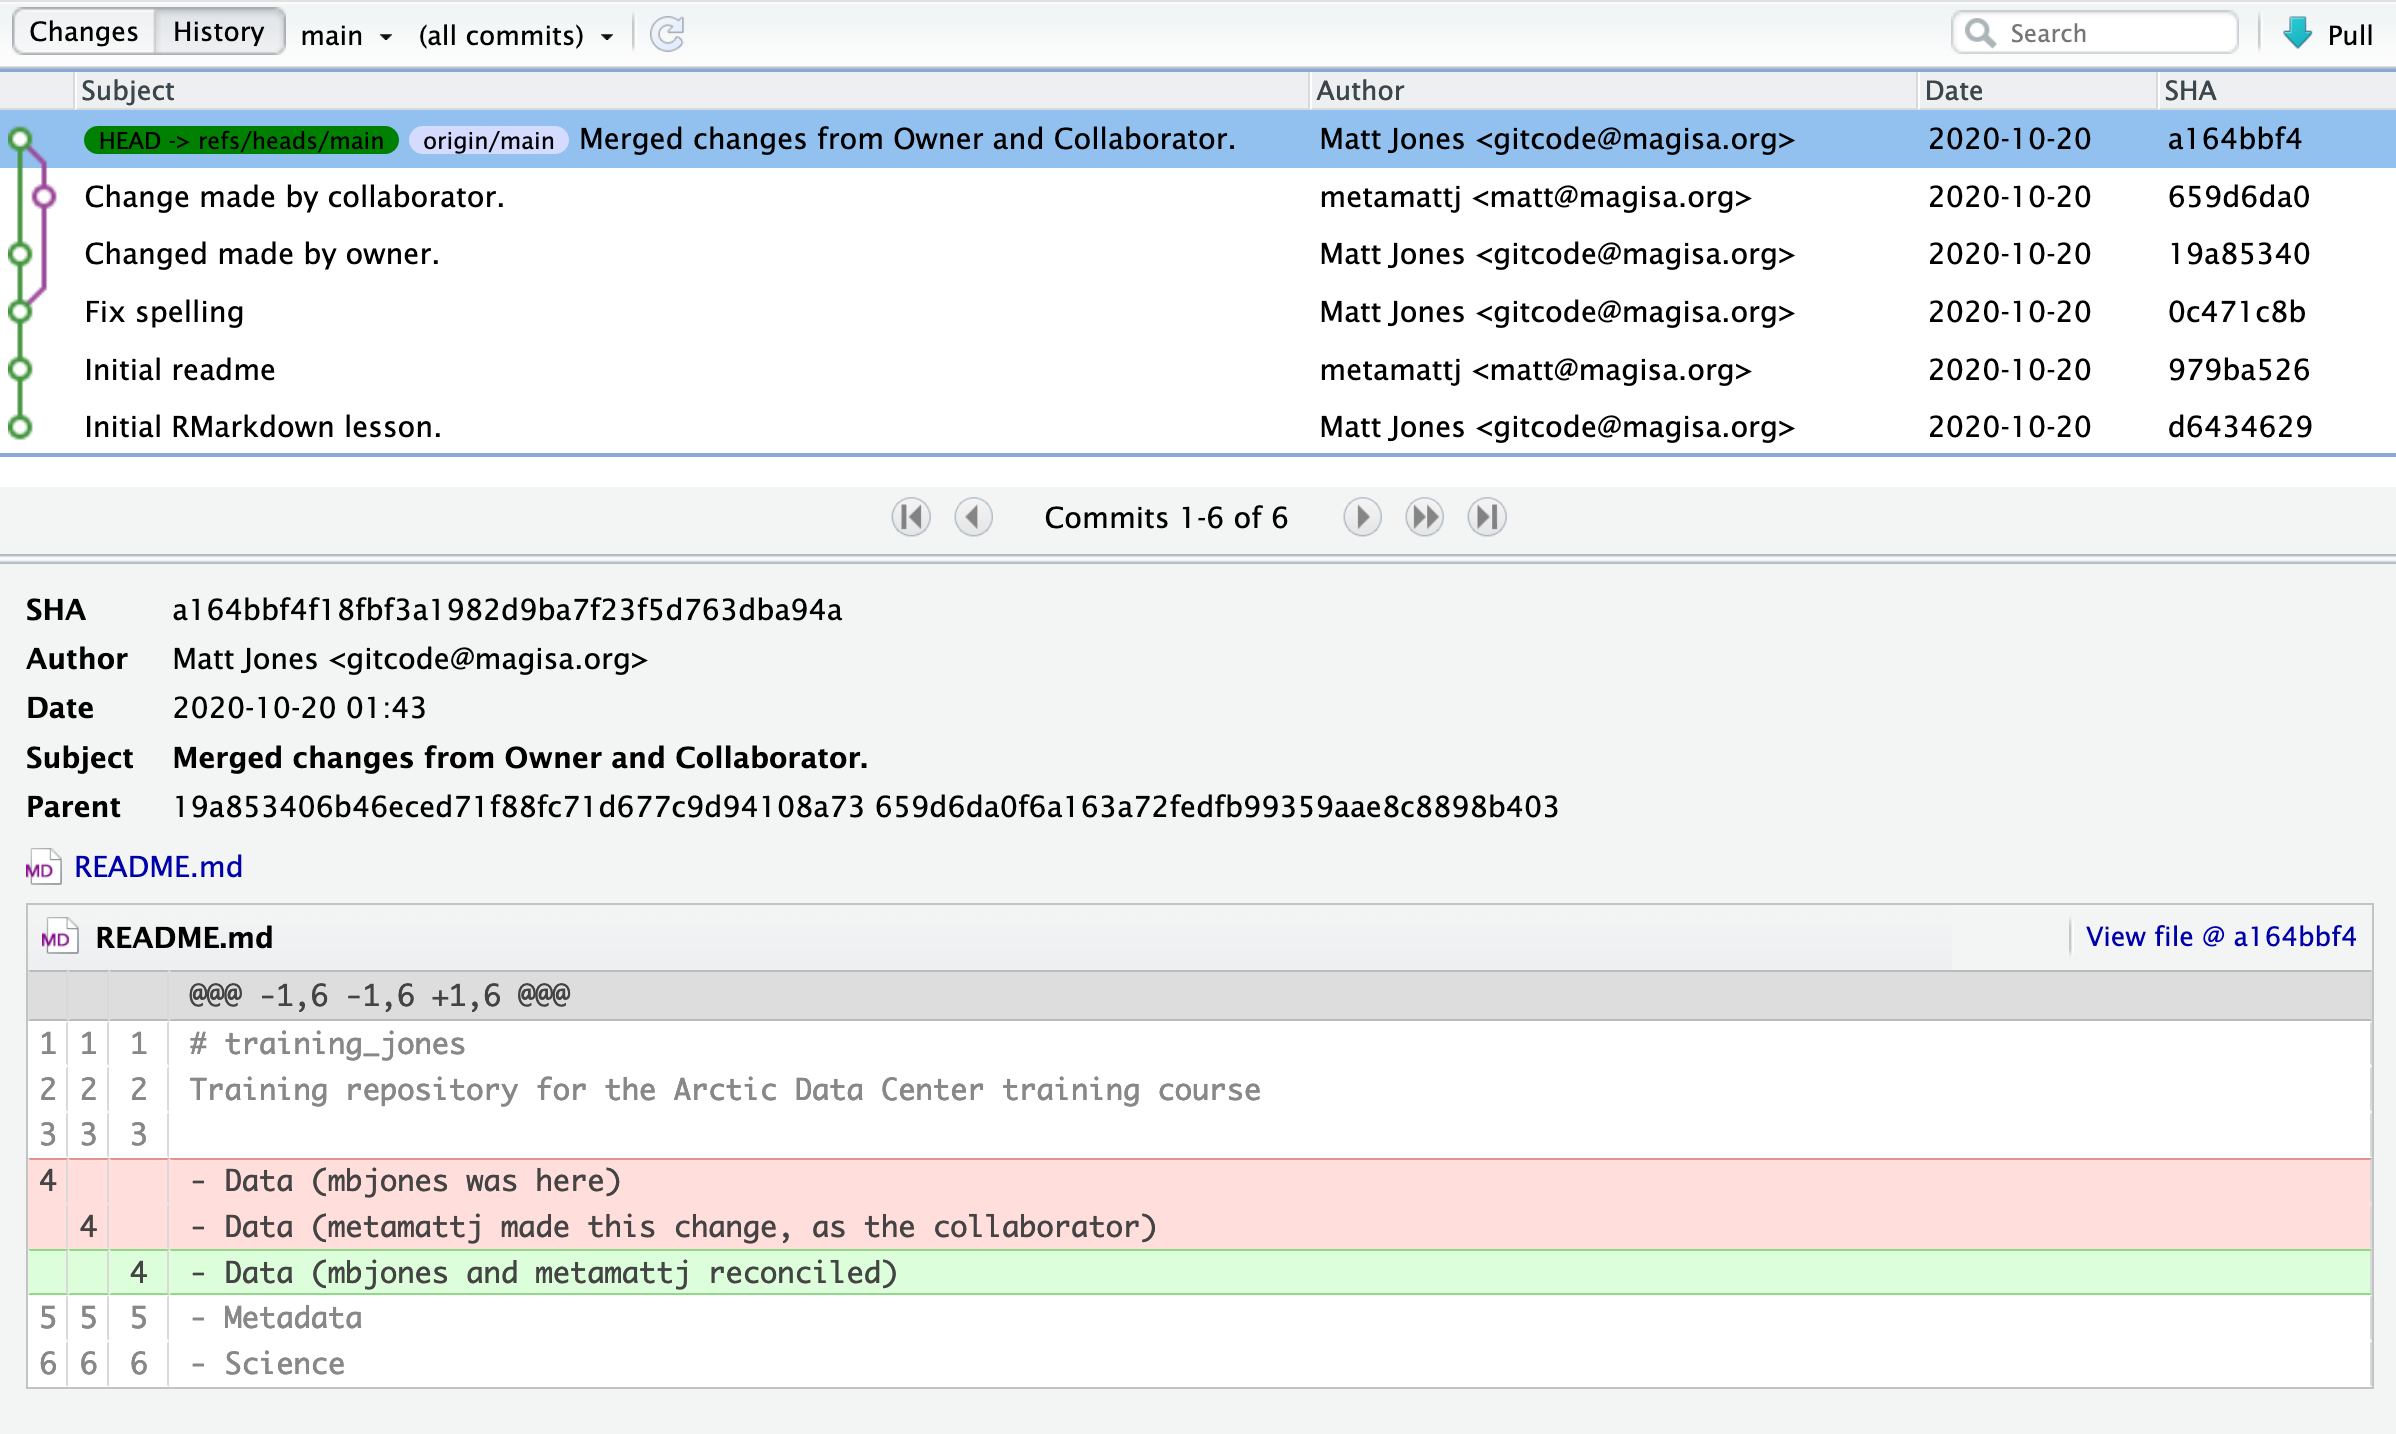
Now it’s your turn. In pairs, intentionally create a merge conflict, and then go through the steps needed to resolve the issues and continue developing with the merged files. See the sections above for help with each of these steps:
- Step 0: Owner and collaborator ensure all changes are updated
- Step 1: Owner makes a change and commits
- Step 2: Collaborator makes a change and commits on the same line
- Step 3: Collaborator pushes the file to GitHub
- Step 4: Owner pushes their changes and gets an error
- Step 5: Owner pulls from GitHub to get Collaborator changes
- Step 6: Owner edits the file to resolve the conflict
- Step 7: Owner commits the resolved changes
- Step 8: Owner pushes the resolved changes to GitHub
- Step 9: Collaborator pulls the resolved changes from GitHub
- Step 10: Both can view commit history
Workflows to avoid merge conflicts
Some basic rules of thumb can avoid the vast majority of merge conflicts, saving a lot of time and frustration. These are words our teams live by:
- Communicate often
- Tell each other what you are working on
- Pull immediately before you commit or push
- Commit often in small chunks.
Always start your working sessions with a pull to get any outstanding changes, then start doing your editing and work. Stage your changes, but before you commit, Pull again to see if any new changes have arrived. If so, they should merge in easily if you are working in different parts of the program. You can then Commit and immediately Push your changes safely. Good luck, and try to not get frustrated. Once you figure out how to handle merge conflicts, they can be avoided or dispatched when they occur, but it does take a bit of practice.
Your turn
- Use your favorite desserts to create a merge conflict. Resolve it using RStudio
- Mixing the fun: try to create a merge conflict using the forking workflow. How would you do this? Try to resolve the conflict on the GitHub website! hint
Aknowledgement
This section had been adapted from NCEAS Reproducible Research Techniques for Synthesis
Individual units were created by (in alphabetical order): Julien Brun, Amber Budden, Jeanette Clark, Matt Jones, Erin McLean, Bryce Mecum, William Michener.
